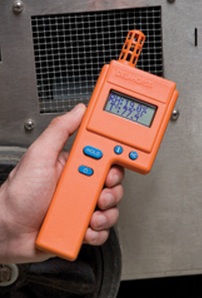
 ASTM F-2170 is the de facto standard for testing moisture in concrete to predict how the slab will behave over time. This process is regarded as the gold standard for concrete testing by manufacturers around the world—many of whom won’t accept any other testing method for warranty purposes because of how accurate and reliable the test is.
As such, it’s very important to be able to carry out ASTM F-2170 testing accurately and consistently. To help you make your concrete flooring moisture tests easier and more effective, here are a few tips to follow:
1: Make Sure You Have the Right Testing Equipment!
ASTM F-2170 testing calls for the use of particular tools to maintain accuracy. To ensure that you can complete your concrete testing with a minimum of difficulty, keep the following tools on hand:
- A rotary hammer drill with 5/8” drill bits
- An industrial-grade vacuum to clean out drilled concrete holes
- A wire brush for scraping the sides of the holes to remove loose debris
- Sensor sleeves for each hole you need to drill (three for the first 1,000 sq. ft., and one more for each additional 1,000 sq. ft.)
- Silicone or another water-resistant sealant to seal any gaps between the concrete and the sensor sleeves
- A thermo-hygrometer that is compatible with remote probes
- In-situ probes to place into the holes and take readings with
These are the minimum necessary tools to ensure that you’re able to get reliable moisture readings in concrete when following the ASTM F-2170 standard. Additional items to bring for such a test include basic safety gear, such as gloves, goggles, and a painter’s mask to protect your hands, eyes, and nose from exposure to concrete dust and shards that may be kicked up while you’re drilling.
2: Double-Check the Depth of the Pit Before Pouring Concrete
One of the key requirements of the ASTM F-2170 testing method is that you have to drill each hole to a depth roughly equal to 40% of the slab’s thickness. This, of course, means knowing how thick the slab is before drilling the hole.
When you’re getting ready to pour your concrete, double-check the depth of the pit first, and make sure that the pit’s depth is either level throughout or clearly marked to indicate any differences in depth if the pit is sloped. This extra step helps to ensure that you can drill as close to exactly 40% of the slab’s thickness as possible for the test—making it easier to adhere to the ASTM F-2170 standard.
3: Choose Your Thermo-Hygrometer Carefully
There are a lot of different thermo-hygrometers available on the market, and not all of them are created equally. For example, every thermo-hygrometer has a “sensor tolerance” value, represented as a plus or minus (±) numerical percentage that varies from one make and model of hygrometer to the next. This is a kind of “margin of error” representing how far a sensor reading might vary from the true relative humidity (RH) conditions of the area being tested.
A good thermo-hygrometer might have a sensor tolerance of ±2% RH. So, if that hygrometer is used in concrete with 14% RH, it might read as low as 12% RH or as high as 16% RH. The larger the number for the sensor tolerance, the harder it is to rely on that hygrometer’s readings.
Another thing to check for is the meter’s compatibility with remote probe connections. It is necessary to use a probe to get a reading deep in concrete, so if the thermo-hygrometer lacks a probe socket, it won’t be useful for ASTM F-2170 standard tests.
4: Take Multiple RH Measurements at Each Hole
Because even the best thermo-hygrometers have a certain degree of sensor tolerance, it’s important to take multiple RH readings at each hole you prepare and average the reading results. This way, you can minimize the impact of a single errant sensor reading to get a more accurate estimate of moisture in concrete.
5: Keep Some Spare Probes Handy
When you perform your concrete tests, consider keeping a few extra in-situ probes handy just in case. This way, if one of your probes starts experiencing sensor drift—the loss of accuracy that occurs when an RH meter’s sensor element is exposed to too much contamination over time—you can replace it with a fresh, accurate sensor.
Additionally, the ASTM F-2170 standard states that the calibration of an in-situ probe needs to be verified if it is left in concrete for more than 30 days. By carrying spares, you can remove old probes that are in need of a check and replace them with new ones without having to waste time.
Need more help making your concrete testing easier and more effective? Contact the experts at Delmhorst for more tips about measuring concrete moisture and picking the right thermo-hygrometer for the job!

Comments